|
|
Home | Audio | DIY | Guitar | iPods | Music | Brain/Problem Solving | Links| Site Map
This work is licensed under a Creative Commons License.
Converting Audio Files in iTunes
Got an audio file that needs to be converted into another format?
iTunes is much more than a digital music jukebox. It's capable of handling many different tasks involving digital music and your iPod or iPhone. Some of iTunes' most popular features include buying music online, burning CDs, and syncing files. But one of the lesser known functions hidden within iTunes is the ability to convert audio files.
Many programs that convert audio files into different formats are pretty complicated and usually cost money. But not iTunes. iTunes is simple, fast and best of all... free.
Requirements:
- iTunes
- At least one song in your iTunes library that you want to convert to a different format.
Why would you need to convert an audio file? Converting audio file types can be useful in many different situations. Here are a few examples:
- You have an AAC file in iTunes that's not compatible with your iRiver music player that can only play MP3 files.
- A WAV file needs to be emailed to a client for approval but it's too big. You need to convert the file to an AAC so it's small enough to easily send via email.
- You are making a music video and want to use a song you purchased from the iTunes Store as the soundtrack. However, the editing program won't import the song because of Apple's protective DRM (Digital Rights Management).
How to Convert Files to Other Formats Within iTunes
- Launch iTunes.
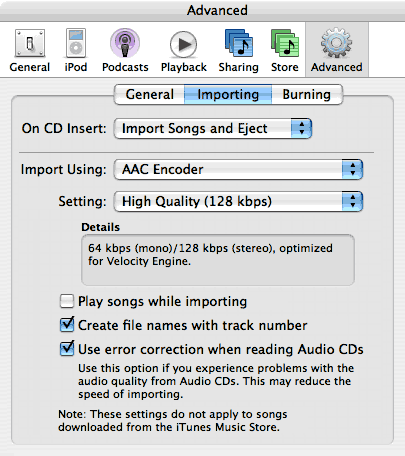
- Open the preferences window (iTunes > Preferences) and navigate to the Importing options screen. Depending on what version of iTunes you are using, the Importing screen may be in a different place. Older versions of iTunes have a separate orange Importing iconin the preferences window. Current versions of iTunes have the Importing options hidden as a nested tab in the Advanced section like in the image below.
What format would you like to convert your audio files to? iTunes is capable of converting to/from the following formats: AAC, AIFF, Apple Lossless, MP3 and WAV.
For example, select MP3 if your friend wants one of your AAC songs converted to an MP3 file so they can listen to it on their non-iPod music player. iTunes also allows you to dictate a bitrate quality for the song(s) that you want to convert. 128 kbps is the default setting and should be a high enough quality for the average person. Select a higher bitrate if you desire.
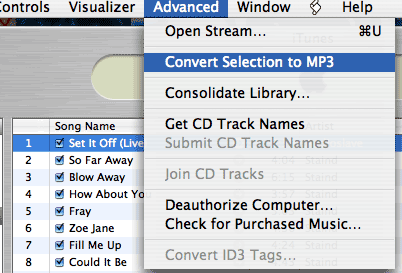
- Close the preferences window and find the song(s) that you would like to convert in your iTunes library. You can hold down the Shift or Apple (Alt on Windows) key and select multiple songs at the same time if needed.
- Select "Convert Selection to..." from the Advanced menu or right-click on one of the selected songs to bring up a contextual menu.
The time it takes to convert the song(s) will vary depending on the number of songs, the type of conversion, and the speed of your computer. You may want to quit other applications if you are in a hurry and need to speed up the conversion process. When iTunes is done converting the songs you will hear a chime. This is the same chime sound that iTunes plays when it has finished burning a CD.
- If one of the songs you are trying to convert was purchased from the iTunes Store and isn't in iTunes Plus format, then you will get an error message saying that protected files cannot be converted to other formats. The best way around this limitation is to burn the protected song(s) to an Audio CD (not a Data CD-ROM!!!) and reimport them back into iTunes.
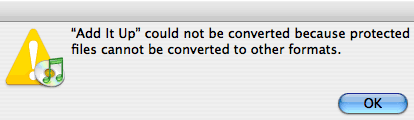
There are several "underground" applications, like Hymn, that will remove the DRM protection from a song purchased from the iTunes Store. However, Apple is constantly looking for ways to disable songs that have had the DRM tampered with. Don't waste your time. Just burn an Audio CD and reimport the songs back into iTunes.
- Once your song(s) have finished being reimported/converted, search your iTunes library for the files. You should find 2 versions of each song you converted. One is the original file, the other is the converted version. If you only want the newly converted version of the song, then delete the old one. One easy way to tell the 2 songs apart is to view your iTunes Library by Date Modified. The newer song is the one you just converted.
In the image below, I have 2 versions of the song called "BPD (Album Leaf Remix). When viewing my iTunes Library by date modified, I can easily see which file was most recently created.
Home | Audio | DIY | Guitar | iPods | Music | Links | Brain and Problem Solving | Site Map | Contact